How to Easily Change Domain Nameservers: Step-by-Step Guide

To change domain nameservers, log into your domain registrar’s account and navigate to the DNS management section. Enter the new nameserver details and save changes.
Changing domain nameservers is a straightforward process but essential for website management. Properly configuring nameservers ensures your domain points to the correct hosting server, allowing your website to function smoothly. This process involves accessing your domain registrar’s control panel, which is typically user-friendly and intuitive.
By updating your nameservers, you direct internet traffic to your chosen web hosting provider. Whether you are switching hosts or setting up a new site, mastering this task can save you time and potential technical issues. Understanding how to manage your domain settings is crucial for any website owner.
Preparing For The Change
Before you change your domain nameservers, you need to prepare. This ensures a smooth transition and avoids downtime. Here are the steps to follow for a successful switch.
Backup Your Current Settings
First, you should backup your current DNS settings. This is important in case something goes wrong. Follow these steps:
- Log into your domain registrar account.
- Navigate to the DNS settings section.
- Copy all existing DNS records.
- Save this information in a safe place.
This backup will help you restore settings if needed.
Gather Required Information
Next, gather the required information for the new nameservers. You will need:
- New nameserver addresses: Provided by your hosting provider.
- Domain registrar login details: To access your account and make changes.
Make sure you have everything ready before proceeding.
Having this information at hand will make the process easier and faster.
Credit: www.wpbeginner.com
Accessing Your Domain Registrar
Changing your domain nameservers might seem challenging. But accessing your domain registrar is simple. Follow these steps to make the process smooth and easy.
Login To Your Account
First, visit your domain registrar’s website. Locate the login button, usually at the top right corner. Enter your username and password. If you forgot your password, use the “forgot password” option. Check your email for a reset link. Once logged in, you will see your account dashboard.
Navigate To Domain Settings
On your dashboard, find the section labeled “Domains” or “My Domains”. Click on it to see a list of your domains. Select the domain you wish to modify. Look for a settings icon or an “Edit” button next to your domain name. Click it to open the domain settings page.
| Step | Description |
|---|---|
| 1 | Visit the registrar’s website |
| 2 | Click the login button |
| 3 | Enter your login details |
| 4 | Navigate to “Domains” or “My Domains” |
| 5 | Select the domain to modify |
| 6 | Click the settings or “Edit” button |
Next, locate the “Nameservers” section. This is where you will update the nameservers. Click on the “Change” or “Edit” button next to the nameservers. Enter the new nameserver addresses provided by your hosting provider. Save your changes to update the nameservers.
- Visit registrar’s website
- Log into your account
- Go to “Domains” or “My Domains”
- Select the domain
- Click on settings
- Update the nameservers
Wait for the changes to propagate. This may take up to 48 hours. Your domain will now point to the new nameservers. This completes the process of changing domain nameservers.
Locating Nameserver Settings
Changing your domain nameservers is a simple process. The first step is locating the nameserver settings in your domain registrar’s dashboard. This guide will help you find these settings with ease.
Finding Dns Management
To locate the DNS management section, log in to your domain registrar. Look for a section labeled “Domain Management” or “My Domains.” This is where you manage your domains.
Once there, you should see a list of your domains. Click on the domain you want to update. You will be taken to a settings page. Here, find an option for “DNS Management” or “DNS Settings.” This is where you can edit your DNS records.
Identifying Current Nameservers
In the DNS management section, you will see your current nameservers. These are usually listed under a heading like “Nameservers” or “Server Settings.”
Nameservers are often in pairs, such as ns1.example.com and ns2.example.com. Write down or copy these nameservers for reference.
To change your nameservers, you will need the new nameserver details. Enter the new nameserver addresses in the provided fields. Click “Save” or “Apply” to update your settings.
Here is an example table showing current and new nameservers:
| Current Nameservers | New Nameservers |
|---|---|
| ns1.currenthost.com | ns1.newhost.com |
| ns2.currenthost.com | ns2.newhost.com |
Updating nameservers may take some time to propagate. Check your new settings after a few hours to ensure they are active.
Updating Nameserver Information
Updating nameserver information is a crucial step in changing your domain’s DNS settings. This guide will help you navigate this process with ease. Follow these steps to ensure a smooth transition for your website.
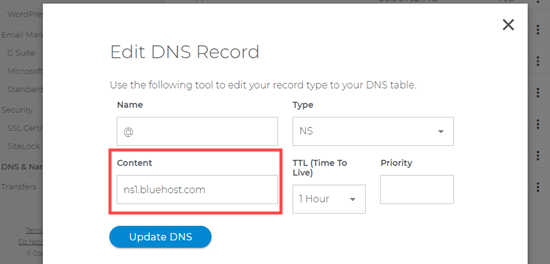
Entering New Nameservers
First, log into your domain registrar’s control panel. Once logged in, find the section for DNS settings. This is where you will enter your new nameserver information.
Typically, you will see fields labeled Nameserver 1, Nameserver 2, and so on. Enter the new nameserver addresses provided by your hosting provider. Ensure each address is correct to avoid issues.
Here is an example of how the fields might look:
| Nameserver | Address |
|---|---|
| Nameserver 1 | ns1.example.com |
| Nameserver 2 | ns2.example.com |
Saving Changes
After entering the new nameserver addresses, look for a Save or Update button. Click this button to save your changes. This step is crucial as it finalizes the update process.
Once saved, your domain will start using the new nameservers. Remember, DNS changes can take up to 48 hours to propagate worldwide. During this time, your website might be temporarily inaccessible.
Here’s a quick checklist to ensure you’ve done everything correctly:
- Logged into your domain registrar.
- Located the DNS settings section.
- Entered the correct new nameserver addresses.
- Clicked the Save or Update button.
By following these steps, you can easily update your domain’s nameservers. This ensures your site remains functional and accessible.
Propagation Period
The Propagation Period is the time it takes for DNS changes to spread across the internet. During this period, your website may not be accessible from all locations. It usually lasts between a few hours to 48 hours.
What To Expect
Once you update your domain nameservers, it takes time for changes to take effect. Your website might go offline temporarily. This is normal during the Propagation Period. Different regions will see your site at different times.
Here’s what you can expect during this period:
- Partial website availability
- Fluctuations in website access
- Emails might not reach you
Checking Propagation Status
You can check the status of your DNS propagation using online tools. These tools show how far along the changes are. They provide information about different regions.
Here are some popular DNS propagation checkers:
Follow these steps to use a DNS checker:
- Visit one of the tools listed above.
- Enter your domain name in the search box.
- Select the DNS record type (e.g., NS, A, CNAME).
- Click on the ‘Search’ or ‘Lookup’ button.
These tools will display the current status of your DNS records. This helps you understand the progress of the Propagation Period.
Credit: www.wpbeginner.com
Troubleshooting Common Issues
Changing domain nameservers can sometimes lead to unexpected issues. These problems are usually easy to fix. Below, we’ll explore common issues and their solutions.
Dns Errors
DNS errors often occur after changing nameservers. These errors can prevent your website from loading. Here are a few common DNS errors:
- NXDOMAIN Error: This means the domain does not exist. Ensure your domain is registered.
- Server Not Found: Your nameservers may not be configured correctly. Double-check your settings.
- DNS Timeouts: The DNS server may be down. Try again later or contact your provider.
To fix these errors, follow these steps:
- Verify that you entered the correct nameservers.
- Check if your domain is active and not expired.
- Contact your hosting provider for further assistance.
Delayed Propagation
Propagation delay is another common issue. It happens because DNS changes take time to spread.
Propagation can take up to 48 hours. Here’s why:
| Reason | Explanation |
|---|---|
| TTL (Time To Live) | The time it takes for DNS records to update. |
| ISP Caching | Internet Service Providers cache DNS records. |
To minimize delay:
- Lower the TTL value before making changes.
- Clear your local DNS cache.
- Use online tools to check DNS propagation status.
If propagation takes longer than 48 hours, contact your DNS provider.
Post-change Verification
After changing your domain nameservers, verifying the changes is crucial. This ensures your website and email systems work smoothly. Below, we explain how to check your website and email functionality.
Testing Your Website
First, you need to make sure your website loads correctly. Follow these steps:
- Open a web browser.
- Type your domain name in the address bar.
- Press Enter.
If your website loads, the nameservers are correct. If it doesn’t, clear your browser cache and try again. Sometimes, DNS changes take time to propagate.
Use online tools to check DNS propagation status:
These tools show if the DNS changes have spread worldwide.
Ensuring Email Functionality
Next, confirm your email system works. Send test emails to and from your domain email address. Follow these steps:
- Open your email client.
- Compose a new email.
- Send it to your domain email address.
Check if you receive the email. Send an email from your domain email address to another email address. Verify if the recipient gets the email.
If emails fail, check your MX records. Ensure they point to the correct mail server. Use the same online tools to verify MX records.
| Test | Tool | Action |
|---|---|---|
| Website Loading | Browser | Type domain in address bar |
| DNS Propagation | What’s My DNS | Check DNS status |
| Email Send/Receive | Email Client | Send test emails |
| MX Records | DNS Checker | Verify MX records |

Credit: www.nameboy.com
Frequently Asked Questions
What Are Domain Nameservers?
Domain nameservers are DNS servers that map domain names to IP addresses, enabling browsers to locate websites.
How Do I Find My Nameservers?
Log into your domain registrar account and check your domain’s DNS settings for the nameserver information.
Can I Change Nameservers Anytime?
Yes, you can change nameservers anytime through your domain registrar’s dashboard or control panel.
How Long Does Nameserver Change Take?
Nameserver changes typically take 24 to 48 hours to propagate across the internet.
Why Should I Change Domain Nameservers?
Changing nameservers can improve site performance, security, or when migrating to a new hosting provider.
Conclusion
Changing domain nameservers is a straightforward process. Follow the steps outlined, and you’ll ensure a smooth transition. Always double-check your entries to avoid downtime. Remember, correct nameserver settings are crucial for website accessibility. Stay patient, and your domain will point to the desired server effortlessly.
Happy hosting!